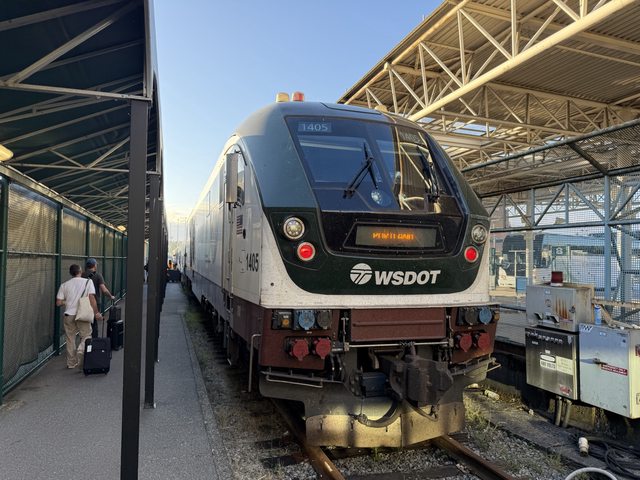
Recently, I took a train called Amtrak from Vancouver, Canada to Seattle, USA.
Here’s my ride report along with some useful tips for anyone planning to make the same trip.
The Train Connecting Vancouver and Seattle
The Amtrak Cascades is the train service that runs between Vancouver and Seattle.
It operates on a schedule of two trains per day in each direction.
As of July 2025, the following two southbound trains run toward Seattle:
| 517 Amtrak Cascades | 7:15 → 11:40 (4 hrs 25 min) |
| 519 Amtrak Cascades | 16:45 → 21:10 (4 hrs 25 min) |
And the following two northbound trains run from Seattle:
| 516 Amtrak Cascades | 8:30 → 12:30 (4 hrs 00 min) |
| 518 Amtrak Cascades | 18:00 → 22:00 (4 hrs) |
We took the 517 going south and the 518 coming back, making it a round trip between Vancouver and Seattle.
If you’re heading to Seattle for a day trip from Vancouver, this schedule works out perfectly.
Of course, the bus is faster and cheaper — but the train is way more fun. No contest.
How to Buy Amtrak Cascades Tickets
You can purchase tickets from the Amtrak official website.
If you book more than 3 months in advance, you can snag a one-way ticket for around $40. Once you’re within that 3-month window, prices jump up considerably.
I only booked about a month ahead, so I ended up paying $85 one-way… ouch.
There are two seating classes: Coach and Business. Unless you really want to splurge, Coach is perfectly fine.
(Business class supposedly gives you access to station lounges, but neither Vancouver nor Seattle actually has one.)
After purchasing, you’ll receive a PDF eTicket via email — make sure to print it out and bring it with you.
Having a printout makes things smoother during the immigration check, especially when they want to verify your return ticket.
ESTA and I-94W Requirements
For entering the U.S. by land, you need both an ESTA and an I-94W.
When flying, ESTA alone is sufficient, but for land crossings, you must additionally obtain an I-94W.
If you’re not familiar with it, you might be wondering “What’s an I-94W?”
It’s the arrival/departure record form for travelers from Visa Waiver Program (VWP) countries entering the United States by land.
The fee is $6. While ESTA is valid for 2 years, the I-94W is required for each individual entry.
You can apply online at the I94 – Official Website or through the smartphone app.
For details on how to apply, check out the following guide:
* You can also pay for the I-94W on the day of travel, but apparently you’ll be taken to a separate room during the immigration process. I’d recommend applying in advance.
My Trip from Vancouver to Seattle
Don’t Go to the Wrong Station — It’s Not Waterfront!
The Amtrak Cascades departs from and arrives at Pacific Central Station.
* Please note: this is NOT Waterfront Station.
Since there’s a U.S. immigration inspection at the station, it’s recommended to arrive at least 90 minutes before departure.
I got to the station at 5:40 AM, haha.
The Expo Line runs near the station, but since its first train doesn’t start until 8:00 AM, I’d recommend taking a taxi.
Arrival at the Station to Filling Out the Customs Declaration (Entry Card)
The station has benches to sit on and restrooms.
You can see a line forming on the left side of the photo — after filling out your entry card, you’ll join this queue.

When you arrive at the station, fill out a customs declaration form. You’ll find them on a desk with the “Amtrak” logo.
Normally you’d probably receive one from a staff member, but everyone was just grabbing them on their own.

This is the standard U.S. customs declaration form (entry card) you’ve probably seen before.
For how to fill it out, I’d suggest referring to a U.S. customs declaration form guide.

Once you’ve finished filling it out, join the line that’s naturally forming.
This photo was taken before 6:00 AM, and the line had already started to build up.
Luggage Weigh-in and Immigration
Before immigration, your luggage will be weighed. You can check in up to 2 bags weighing 23 kg (50 lbs) or less for free.
These details may change, so I recommend checking the official page:
Immigration processing started around 6:10 AM. Business class passengers get priority, of course.
During the immigration interview, I was asked about my purpose of travel, length of stay, where I’d be staying, and they also checked my return ticket.
They also took my fingerprints, and the officer actually gave me the finger instructions in Japanese!
I’ll never forget the officer suddenly saying “oyayubi” (thumb) out of nowhere, haha.
* According to other travelers’ reports, if you haven’t paid the I-94 fee, you’ll be sent to a separate room.
Through Immigration — Time to Board!

After clearing immigration, it’s time to head to the platform.
These overseas diesel-powered trains look so cool. They really give off a powerful vibe.
On the way to the platform, there’s a counter where you can check in your luggage — show your ticket and drop off your bags there.
I checked in 2 large suitcases and left about a $5 tip.

Here’s what the interior looks like — Coach class is unreserved seating.
About half the seats face backward (opposite the direction of travel), so take a good look before choosing your seat.
The overhead racks are spacious enough to fit a carry-on sized suitcase with room to spare.

There are ticket holders on the overhead racks, so you slip your ticket in like this.
By the way, the train started moving at 6:58 AM — before the scheduled 7:15 departure. Typical overseas experience, right?
Exploring the Train and Grabbing a Bite at the Bistro Car
As you might have noticed from the boarding photos, the train interior was surprisingly clean.

Based on other people’s ride reports, I was expecting a much more worn-down train, so I was pleasantly surprised.
I didn’t take photos of the restroom, but it was very clean too. Even someone like me who’s a bit particular about cleanliness didn’t mind it at all.

There’s a speedometer display in the car. The clock display was broken though, haha.
The whole design is so different from what you’d see in Japan — really cool.

The train has a bistro car (snack bar) that sells light meals and drinks.
You can see the menu in the photo — beverages and snacks are available.
The Bistro Menu is also posted on the official website, so definitely check it out.

You’ll need U.S. dollars on the train. Credit card payments (tap-to-pay) were also accepted.
By the way, the credit card terminal had one of those tip-selection screens.
There’s only one staff member working the bistro, so service can take a while and lines do form — heads up.
Also, the train rocks quite a bit, so be careful not to spill anything. There were plenty of spill stains on the floor…

I got a Starbucks Coffee ($2.50) and a Breakfast Sandwich ($5.50).
That’s $8 total — pretty reasonable!
Safety on Board
The train I was on felt very safe and peaceful. There was no one acting strangely, and the passengers were mostly families.
A lot of people were sleeping on the train, which I took as a good sign of how safe it felt. I took a little nap too, haha.
That said, keeping your valuables on your person at all times is an obvious must.
Crossing the Border into the U.S.
While in Canada, the train was running at about 30-40 km/h (20-25 mph), which felt really slow.
It reminded me of riding a packed commuter train during rush hour in Japan, haha.

At 8:26 AM, we reached the Canada-U.S. border.
When crossing by car, you apparently go through immigration at an interchange-like checkpoint, but the train does things differently.
The train comes to a stop here.
An announcement plays saying to return to your seat and have your passport open to the photo page, so everyone gets ready.
U.S. immigration officers and a drug-sniffing dog walk through the train to check everyone.
They collected the customs declaration forms, glanced at the photo page of our passports, and that was it — no questions asked.
Once everyone’s been checked, the train starts moving again.
After entering U.S. territory, the train picks up speed, which feels great.

Once we were in the U.S., the overhead monitors that had been off suddenly turned on.
The onboard Wi-Fi also became available, but it was too slow to be of any real use, haha.
From here, the train makes several stops at stations within the U.S. before reaching the final destination.

I thought we’d arrived, but the monitor was throwing a 404 error, haha.
Arrival and Baggage Pickup

At 11:56 AM, we arrived at King Street Station in Seattle.
The train had been holding just outside the station for about 10 minutes, so we were about 15 minutes behind schedule.

Here’s what the station interior looks like — it was more bustling than I expected.
To pick up checked baggage, head to the area marked “BAGGAGE” — pretty self-explanatory.

The bags come out on a belt conveyor, just like at an airport.
It took about 20 minutes for my luggage to show up, though.
If you’re in a hurry, you might want to skip checking bags altogether.
Plenty of Taxis Waiting Outside the Station
After picking up my luggage, I called a ride using Lyft (a rideshare app).
There were tons of taxis and rideshares parked outside the station waiting for fares, so even using the cheaper Wait & Save option, a car was matched instantly.
With the weak yen making the dollar expensive, every little saving helps.
We stayed at a hotel near Lake Union, about 3 miles from the station. Between traffic and the exchange rate, the taxi ride came to about $30 — yikes.
Final Thoughts
That wraps up my ride report and travel tips for the Amtrak Cascades. I hope you found it helpful!
Crossing an international border by train was something I’d always wanted to do, and it was an incredibly exciting and memorable experience.
Please note that the information in this post is based on my trip in July 2025. For the latest details, be sure to check the official websites.
I hope this helps anyone planning to take the same trip. Thanks for reading!
Leave a Reply